Pages

Monday, July 27, 2020

A Million Hugs

Happy Monday!  I am here today to share a sweet birthday card intended for a friend. It features some of the mid-July release from Whimsy Stamps


Isn't it fun and so special.  Perfect for someone who likes to sew or quilt. 

I made this by stamping the Cross-Stitch Heart background stamp.  I put it in my misti and used distress ink to create a rainbow of color, then I stamped it.  Next, I cut it out using the Wavy Rectangle die.  I wanted to back this in black with the same shape, but the next bigger die was too big.  So I traced it on black and cut by hand.  I stamped the elements from Cross-Stitched Sentiments on the front, tacked it down to the black layer and set aside. Next, I folded my black base and trimmed a piece of DP from the Rainbow Paper Pack and adhered it.  I added my wavy stitched layers.  Finally, I added some black hearts and twine.


I hope you like it and thank you for visiting!


Tuesday, July 21, 2020

Fun and Fabulous

Hey friends!  Happy Tuesday!

I have another fun card today featuring some new stamps from Whimsy Stamps.  This is just a quick post, but I couldn't wait to share. 


Isn't it so fun!?  I shared a card using the Cute and Curvy set yesterday and I LOVE this set.  Because, as I said, not all of us chica's are skinny little things and we deserve to have stamps too!  But, that isn't even the newest product here.  The newest is the lovely Fern Background Stamp.

To make this, I stared with the Fern Background and put it inside my Misti.  I inked it up with Crushed Olive, Twisted Citron and More Mustard Distress Inks.  Then I spritzed some water on it to give it this look.  Next, I stamped my images from Cute and Curvy and colored it with my Copics.  Then I cut her and her pup out and placed them on my background, which I mounted on my white base using foam tape.  Then I stamped my sentiment on yellow and added a black layer behind it.  Lastly, I added these sweet green butterflies.

I know this was a quick post, but hope you like it!

Thanks for visiting.

Sunday, July 19, 2020

Tutu Cute!


Happy Sunday!  I was up in my crafty room yesterday and I was playing with the new Cute and Curvy Stamp Set from Whimsy Stamps.  I love this set because not all of us ladies are the skinny types.  There are a lot of skinny girl stamps, but not so many plus size and plus size is beautiful!


Don't you think I have made my case for this cute gal?  And she has spunk too, her fun outfit, pink hair and dressed up pup!

I stamped and colored my images (the dog and gal) with Copics (Y15, Y13, FV2, BV13, C9, C7, C5, C3, C1, E00, E02, RV09, RV25, RV04, RV02) and fussy cut them out.  Then I took my white base and used an edge die with a layer of black and a layer of the Rainbow Paper Pack to set up the stage. Once I put the paper down, I added my stamped images.  Then I stamped the sentiment on black with Versamark and used White Wow Embossing Powder, then I popped it up with foam tape.  Then I took some purple paper and die cut the hearts from the Puppy Paws Die Set and added them to the scene.


Oh, I forgot to mention I added some white highlights as well with my gel pen. 

I hope you think she is cute because I sure do!  I love her sassy self. 

Thanks for visiting!

Wednesday, July 15, 2020

Fabulous

Hello Wednesday.  Today is one of those days that I just need a little more pep to get through the week.  I have a fun card to share that will hopefully do that. 


Today's card features the new stamp set from Whimsy called Braided.  It is fun and cute and fabulous!  It made me happy to color her hair rainbow. 

To make this card I used a stencil and a bunch of distress inks for the background.  I just left what was on my brush there and I used it.  Then I stamped and colored the hair with my Copics (FV2, V17, V15, V12, RV06, RV04, RV02, YG13, YG11, YG07, YG06, Y15, Y13, Y11, YR23, YR09, YR07, YR04, YR02, B29, B26, B24, B12, B05, B02, B01, B0000).  After I colored it I cut it her hair out and set it aside.  Next, I cut a bit of DP from the Licorice DP Pack and tacked it down with some Doodlebugs Washi Tape.  I stamped the sentiment and then popped up the image using foam tape.  Then I added some black sequins.   


It is a pretty easy card with some big pop!  I think (and hope) that a friend would really like to get this card in the mail. 

Entering this into- Inspirational


Thanks for visiting!

Friday, July 10, 2020

Not your typical wedding card


Happy Friday!  Who's ready for some fun!?  I have a super fun and cute card to share today, it makes me BEYOND happy.  Lookie see:


BWAHAHA!  No, not your traditional wedding card, but super fun for a Bigfoot or outdoor lover.

This card actually took quite a bit of work with a lot of different products, but it was totally worth it.

Here's what I did:
  • I started by stamping and coloring my dual bigfoots from the Unbelievable Stamp Set twice, each slightly different colors (opposites).  For the gal, instead of stamping her mouth, I masked the mouth portion off and added the lips from the Monster Love Stamp Set and drew in the smile line and eyelashes.  I added lipstick prints on the boy.  Then I used the coordinating Unbelievable Die set to cut them both out. 
  • Next, I stamped out some flowers from the Let The Good Times Roll stamp set and Coordinating Die Set to create the floral crown.  I hand cut a vellum veil to add behind her.  
  • From the same stamp and set, I stamped a mushroom and some flowers for my scene, colored them and set them aside. 


  • Next, I created the background.  First the sky with some Tumbled Glass distress in and my Blending Buddy.  I die cut the sun in yellow from the Cloudy Day die and used Lemonade, Mustard and Ripe Persimmon to add some color.  I placed in in the background with some clouds. 
  • I used the Wonky Stitched Wilderness with some kraft CS for the mountains and added some extra color with markers. I used the Slimline Scenic Borders with green cs to create the grass. Once I put it all together, I cut it with a scalloped frame die. 
  • After the background was set, I added the trees, flowers and mushroom and then the bride and groom. 


Well that's all friends, hope you enjoyed this cute couple!  Thanks for visiting!

Thursday, July 9, 2020

Night Sky


Have anyone you are missing?  Well, then I have the perfect card for you and some new products to go with it!  Check out this sweet card I made using a new release from Whimsy Stamps


Isn't it sweet?!  It totally reminds me of Fievel, the mouse, from An American Tale (movie).  And if you don't know what I am talking about, you are just a spring chicken and look it up on google. ;) 

Here is how I made it. 

  • I started by stamping the background with the moon and stars from the brand new Soul Sisters set with Versamark and used Wow Embossing Powder to set it.  
  • Then I came in and used distress inks to create the sky (Wilted Violet, Chipped Sapphire) and Spritzed it a bit.  Then I came back in with a yellow colored pencil to make the moon pop. 
  • I set that aside and die cut the window using the Arched Window Die with a woodgrain paper. I mounted that and then shaped my card to match it. 
  • Then I used a bit of blue cardstock to create a window seat.  I used more of that and the Calico Paper Pack make another pillow.  I mounted them with foam tape. 
  • I stamped the girl and her bear.  I colored her with my Copics (E00, 02, 11, 13, 31, 33, 37, Y06, Y11, YR31, B23, B93), cut her out and mounted her.  
  • Inside I stamped the sentiment, "I count my lucky stars every time I think of you."


Anyway.... this is just a sweet and hart warming scene.  I wonder if she is wishing on a star, watching for Santa or thinking of a friend.  What do you think she is up to?

Check out this new release, it is worth it!

Thanks for visiting!


More bee puns

Happy Thursday!  Who's ready for the weekend?  I was on Monday, lol. 

But enough about that.  I have another fun bee card for you today... complete with some classic literature and a bee pun. 


I wanted this guy to look a bit fuzzy, so I attempted to color him that way.  I am not 100% certain I achieved the look I was going for, but I like it none the less. 

Here is how I made it: 
  • Stamped my bee from Bizzy Bee Stamp Set and colored him with my Copics (C7, C5, C3, C1, 0, T6, Y15, Y13, YR23, R35, R14, BG10).  I added a few white highlights with a gel pen, cut him out and set him aside. 
  • Next, I created my white base background.  Then I used a border die with the Bizzy Bee Paper Pack and in a layer of rust paper to create the the setting for my bee. 
  • Then I die cut a white speech bubble from Comic Speech Bubbles.  I stamped my sentiment and added some shading and mounted on my card with some foam tape. 
  • I also mounted my bee with foam tape. 
  • Lastly, I added some black twine to wrap things up. 


Don't you like his dramatic flair?!  Also the paper is so darn cute. I hope you like it too! 

Thanks for visiting!

Saturday, July 4, 2020

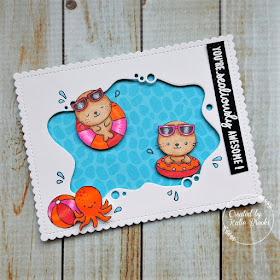
Sealously Awesome

Happy 4th of July!  I hope you have some fun plans today.  I, well, I don't.  LOL.  But that's ok, would rather stay safe and not pass on germs. 

In the spirit of summer and fun, I have a super cute card for you today.  
 

These seals are just ADORABLE!  I got them the moment they came out.   They are from the Sealously Sweet set from Sunny Studio.  I wanted them bright and fun and coupled them with Sea You Soon, also from Sunny Studio.  The background DP is really old from Stampin' Up!  I made the perfect pool bottom when I paired it with this fun shape from Memory Box.  The white is also cut with the Frilly Frames Die (SS).


I stamped the sentiment on black with versamark and embossed it in white, so it would pop.  I just love the end result, it makes me happy. 


I made this and wanted to enter it into the current Cupcake Inspiration Challenge.


Oh, BTW, Ellen's is having a 4th of July Sale. ;)


Supplies Used: